Art Test: UI Design + Implementation (UE4)
PROGRAMS USED
UE4, Adobe Photoshop, Adobe After Effects
DESCRIPTION
For this Art Test, I designed and implemented UI for an exciting, slightly toony in a Overwatchfirst-person shooter in Unreal Engine 4. I wanted to blend in a little bit of a classic comic book style into the UI as well, which I showed through sharp lines and the dotted pattern that is used in most of the assets on the screen. In Unreal Engine 4, I used Blueprints and Widgets to implement my assets and get it so that the start banner, match timer, and ammo counters work.
GENRE
FPS
PLATFORM
Console/PC
The Making Of
Getting Started/UE4 Setup
-
Started UE4 project with First Person Default Project
-
Created a folder for all HUD assets titled “HUD_Assets”
-
Created a HUD widget, titled “FPS_HUD”
-
Within the “FirstPersonCharacter” Blueprint, extended from “Event BeginPlay”, I attached the “FPS_HUD” widget and added it to the viewport, which allows for the HUD I create in the Widget to show up on the HUD
-
-
HUD Design Process
-
I began with making a 1920 x 1080p (600 dpi) document in Photoshop for my sketch and mock-up HUD
-
After looking at references, and really considering the games suggested on the Art test document, I planned the direction I wanted to go for with the UI, which was adding a slight comic book twist to the Overwatch/Fortnite styled UI

-
I made a rough sketch to give a basic feel of what the layout and look of the UI will be
-
Then, I came up with a color palette to match the art style I was going for. I chose a bright, fun palette to match the mood I was going for
-
After that, I brought the sketches of each asset into a separate 3000 x 3000p (600 dpi) canvas, and illustrated them there. That way, they can be scaled down as needed for the mock-up and in UE4
-
For the Ammo and Health bars, I illustrated a full version of the bars and an empty version so they can be implemented later in the engine. The Shield bar would use the same empty version as the Health bar.
-
Next, I took copies of the illustrations from the larger document, pasted them into my mock-up document, and placed/scaled them in their respective spots in the mock-up according to my sketch (I also made slight adjustments when needed)
-
I then exported the assets from the larger document as PNGs and imported them into UE4, into the “HUD_Assets” folder

-
Then, back in UE4, in the FPS_HUD Widget, I put my PNGs in place according to my Mock-up (this included the Shield Bar, as it was a non-functional bar), and empty progress bars where the Health and Ammo bars were going to go

The Banner!
-
Started with illustrating it in Photoshop, making sure to separate whatever pieces were going to be animated
-
From Photoshop, I exported the image as a PNG to be brought into After Effects to be animated
-
In After Effects, I played with the Scale and Opacity to make the text have a “pop” effect when it plays

-
To make the “confetti”, I precomposed a black Solid. In there, I used a particle effect called, “CC Particle World”, and made adjustments to get the shape, speed, color, and amount of particles I wanted
-
I then drew an ellipse Shape around the effect, and switched its mode to Stencil Alpha so it can make its background transparent
After finishing animating, I exported the animation as a PNG sequence

HUD Implementation, Match Timer (UE4)
-
Started with implementing the match timer
-
Placed three separate text boxes, one for the minutes, one for the semi-colon, and one for the seconds, and changed the text style to match my Mock-up
-
Then, within the FirstPersonGameMode Blueprint, I created two variables, titled “Minutes” and “Seconds”, and made them integers
-
From there, I created the graph that ticks down the seconds, and when the seconds hit 00, ticks down the minute


-
Then in the Details Tab, under “content”, I clicked “bind”, which created the “Get_Minute_Timer_Text_0”, and created a graph that would display the minutes and seconds to their respective text boxes
-
I applied this same process for the seconds text box

HUD Implementation, Ammo Bar and Counter (UE4)
-
First, within the “FirstPersonCharacter” Blueprint, I created two variables; the “MaxAmmo” and “CurrentAmmo”,made them floats, and made the default value of both 100
-
Then, I went to the “Spawn Projectile” Comment, and pulled out “InputAction Fire” to give myself room to add to the graph
-
I then created a function that minuses one from the ammo counter when used titled, “Ammo_Decrease”
-
Extended from “Pressed”, I added a branch with a “Current Ammo <= 0” condition, and if true, will minus one from the current ammo, and if false, won’t shoot

-
Then, in the FPS_HUD, I used the “bind” to hook up the current ammo to the bar and the text box above the bar, and these functions are titled, “Get_CurrentAmmo_AmmoCounter_Text” and “Get_AmmoCounter_Bar_Percent_0"

-
Then, after making the ammo bar and counter functional, I added the empty and full ammo bar PNGs to the bar in the HUD Widget, and edited the text to match the Mock-up
HUD Implementation, Health Bar and Counter (UE4)
-
Similarly to the Ammo Bar, within the “FirstPersonCharacter” Blueprint, I created one variable called “Health”, made it a float, and made the default value 100
-
From here, I can later apply things like Damage, Regen, and the like
-
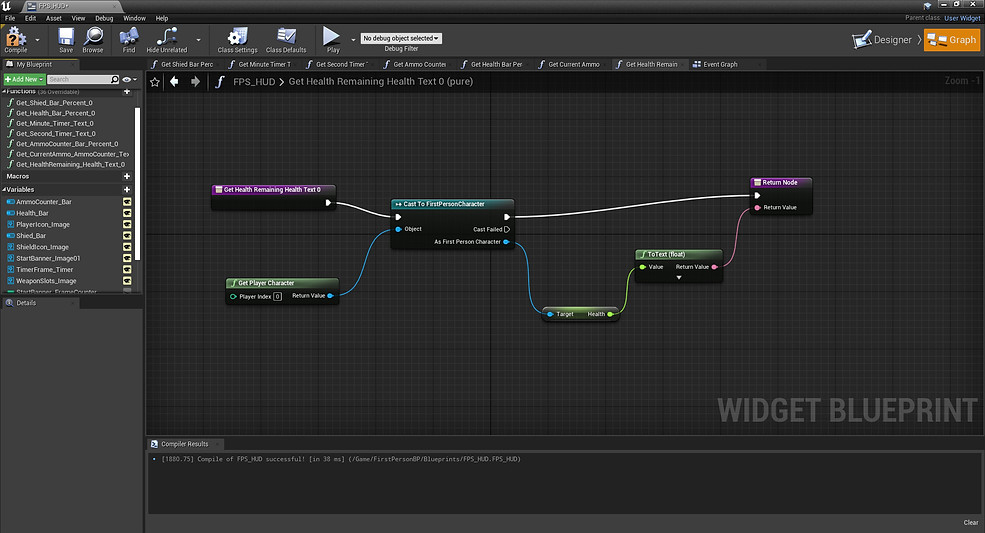
Then, in the FPS_HUD Widget, I binded the Health Bar to the Health from the FirstPersonCharacter Blueprint, and I used the “bind” to hook up the Health to the Health Bar and the text box beside the bar, and these functions are titled, “Get_HealthRemaining_Health_Text_0” and “Get_Health_Bar_Percent_0”

-
Then, after making the Health Bar and Counter functional, I added the empty and full Health Bar PNGs to the bar in the HUD Widget, and edited the text to match the Mock-up
HUD Implementation, Start Banner (UE4)
-
First, I exported the finished Start Banner animation from After Effects as a PNG sequence, then brought in those PNGs into its own designated folder in a folder titled, “StartBanner_Asset” within the “HUD_Assets” folder
-
From there…
-
I selected all the PNGs
-
Pressed “Apply Paper2D Texture Settings”
-
Converted them into Sprites, and put those Sprites into a designated folder in the “StartBanner_Asset” folder
-
I then made the Sprites into a Flipbook
-
Then, placed the first Sprite of the animation in the FPS_HUD Widget
-
-
Then, in the FPS_HUD Event Graph, I created two variables titled, “StartBanner_FrameCounter” and “StartBanner_Delay”
-
Extended from Event Construct, I set the values of the “StartBanner_FrameCounter”, which sets the start of the animation frame, to 0, and the “StartBanner_Delay”, which sets the speed of the animation, to 3

-
Then, extended from the Event Tick, made this graph, which makes the Flipbook play from the first frame, where we placed the first Sprite in the HUD

HUD Implementation, Cross-hairs (UE4)
-
Because the First Person default UE4 scene already comes with implemented crosshairs that are already conformed to the gun, I used the pre-set graph and replaced the default crosshairs with the one I made that matched my Mock-up (the blue highlight where my mouse is hovering is where that can be done on this graph)
